



How to Teach SnapWords® Most Effectively: A Step-by-Step Guide
SnapWords® are most effective when they are used as part of a consistent teaching routine—not simply shown to children like traditional flash cards.
Each SnapWords® card provides a meaningful visual and multisensory bridge to the printed word. The goal is to use that support during instruction and then gradually remove it so the child can recognize, read, spell, and use the word independently.
This guide walks you through how to teach SnapWords® step by step, whether you're using them in a classroom, homeschool, intervention group, tutoring session, or at home.

Before You Begin: Choose the Right Starting Point
SnapWords® are organized into progressive lists and levels, making it easy to work with a manageable number of words at a time.
If you're not sure where to begin, determine which words the child already recognizes automatically when they are shown without pictures or other prompts.
There is no need to reteach words a child already knows securely.
Begin with the first level containing words the child does not yet recognize automatically.
Work With About 10–12 Words at a Time
Rather than introducing a large stack of cards, focus on the words in one SnapWords® level—generally 10–12 words.
A smaller group allows children to become familiar with the words while still giving them enough variety for meaningful practice.
Display the current words in a pocket chart or another place where they are easy to see and access during instruction.
As children learn the words, continue reviewing previously taught words so recognition becomes increasingly automatic.
Step 1: Introduce the Word
Begin with the illustrated side of the SnapWords® card.

Say the word and make sure the child knows its meaning.
Talk briefly about how the illustration relates to the word. The image is designed to create a meaningful connection between something abstract—the printed word—and something the child can understand and remember.
But the illustration is only the beginning.
The goal is always to bring the child's attention back to the printed word.
Step 2: Teach the SnapWords® Mini-Lesson
Each SnapWords® list includes Mini-Lessons that guide you through teaching the words.

Use the Mini-Lesson rather than treating SnapWords® as ordinary flash cards.
Depending on the word, the lesson may draw attention to:
- the sounds in the word
- letters and sound-spelling relationships
- a phonics or spelling pattern
- regular and irregular parts of the word
- word meaning
- spelling
- sentence use
- related words
The Mini-Lessons help children connect what they hear, see, say, and do with the printed word.
This is an important part of the SnapWords® approach: the picture and movement reinforce the literacy instruction rather than replace it.
Step 3: Use the Body Motion and Verbal Cue
SnapWords® lessons often include a body motion and verbal cue connected to the word.
Have the child participate.
Say the word together, perform the motion, and use the verbal cue provided in the lesson.

The movement should be purposeful and connected to the meaning or concept being taught, rather than movement simply for the sake of being active.
For children who respond especially well to kinesthetic learning, this can provide another memorable connection to the word.
Step 4: Focus on the Sounds and Spellings
Now direct attention specifically to the word itself.
Depending on the child's current phonics knowledge, help them notice the sounds in the word and the letters or letter combinations that represent those sounds.
You might:
say the word slowly
identify or segment its sounds
notice a familiar spelling pattern
identify a part that is irregular or not yet decodable
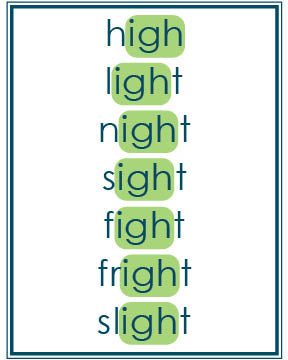
compare the word with other words containing the same spelling
and:
spell or write the word
For example, if a child learns HIGH, the IGH spelling can later serve as a familiar reference when that spelling appears in other words.
SnapWords® are not intended to teach children to memorize the overall shape of a word. The visual provides a meaningful memory connection while instruction directs attention to the word's sounds, spellings, and meaning.
Step 5: Flip the Card to the Plain Side
This is one of the most important steps in teaching SnapWords®.
Once the child is becoming familiar with a word, flip the card over.

Now the child sees only the plain printed word.
Ask the child to read it.
If the child recognizes it, wonderful—the instructional support is beginning to do its job.
If not, return briefly to the illustrated side, review the connection, and try the plain side again later.
The picture should not remain permanently available as something the child needs in order to identify the word.
Think of the illustrated side as a scaffold.
We use it while it is helpful and gradually remove it as the child becomes independent.
Help Children Transition From SnapWords® to Plain Words
The meaningful image, body motion, and verbal cues used with SnapWords® are instructional supports. The goal is for children to recognize the plain printed word automatically, without needing the picture or other cue.
Some children make this transition very quickly. Others benefit from additional practice connecting the illustrated SnapWord® they know with the same word in plain print.
Here are several ways to make that transition explicit.
Use SnapWords® as Temporary Support During Reading
The Easy-for-Me™ Children's Readers provide a natural opportunity to move from learning individual words to recognizing those words in connected text.
Before reading, identify the SnapWords® that appear in the book and briefly review only those words.
Then place those cards beside the child while reading. Explain that they're available if help is needed.
During reading, if the child hesitates on one of the words, give them a few seconds to retrieve it independently. If needed, point to the corresponding SnapWords® card as a reminder.
As recognition becomes stronger, reduce the support:
illustrated SnapWord® → plain-word side → no card
Eventually, the child should be able to recognize the word independently in the book without referring to the card.
The goal isn't to keep the child dependent on the visual. The visual helps establish a meaningful memory connection that can gradually give way to automatic recognition of ordinary print.
Try SnapWords®-to-Plain-Word Matching Games
Short games can provide additional retrieval practice while children make this transition.
Flash N' Match
Write five or six learned words on index cards, one plain word per card.
Show one SnapWord® and have the child quickly find the matching plain-print word. If the match is correct, the child keeps the card. Continue until all the words have been matched.
As the child becomes more confident, increase the number of words or mix in previously learned words.
Making Pairs
Create pairs consisting of one SnapWord® and one matching plain-print word.
Shuffle the cards and have the child match each SnapWord® with its plain counterpart.
If the child hesitates, draw attention to the letters and sound-spelling relationships in the word rather than asking the child to memorize its overall shape.
The objective is to strengthen the connection between the familiar SnapWord® and the same word in ordinary print.
Sight Word Run
For children who enjoy movement, place plain-word cards in a line on the floor.
Give the child the corresponding SnapWords®. Have the child select one SnapWord®, then move quickly to the line to find its plain-print match before returning for another.
Movement makes the practice active, while the instructional task remains focused on recognizing and matching the printed word.
Sight Word Toss
Write learned words in plain print on index cards.
Toss the cards into the air and let them fall onto the floor. Give the child several corresponding SnapWords® and have them find each plain-print match.
For a greater challenge, remove the SnapWords® entirely and call out a word for the child to retrieve from the scattered plain-print cards.

Keep Reducing the Support
Transition activities shouldn't become a permanent stage of instruction.
Once children consistently recognize a word in plain print, practice it in:
- phrases
- sentences
- Easy-for-Me™ Children's Readers
- other connected text
- spelling and writing
Continue mixing previously learned words with newer ones so children retrieve the words rather than simply remembering the order in which they were taught.
The progression is:
learn → retrieve → recognize in plain print → apply in reading and writing
That's the ultimate purpose of SnapWords® instruction.
Additional transition activities are included in SnapWords® Mini-Lessons and SnapWords® Mini-Lessons II.
Step 6: Mix New and Previously Learned Words
Avoid practicing the same word over and over until the child can repeat it from short-term memory.
Instead, mix the current words together.
Then mix newly learned words with words from earlier levels.
Return to them later in the lesson, later in the day, and on subsequent days.
This gives children opportunities to retrieve words after time has passed.
A child who can recognize BECAUSE immediately after practicing it five times may not necessarily know it securely.
A child who sees BECAUSE tomorrow among several other words and recognizes it without assistance is showing much stronger learning.
Step 7: Add Learned Words to a Word Wall
As children become secure with words, add them to a word wall.

The word wall provides a useful reference for reading and writing while also celebrating the growing number of words children know.
Whenever possible, display the plain printed word so children continue strengthening recognition without depending on the SnapWords® illustration.
Encourage children to refer to the word wall when they need a familiar word in their writing.
Step 8: Practice the Words in Connected Reading
Recognizing a word on a card is only part of learning to read.
Children also need to encounter words in sentences and connected text.

The Easy-for-Me™ Children's Readers provide reading practice that allows children to apply the words and phonics concepts they have been learning.
As children read, encourage them to attend to the printed words.
If a previously taught SnapWord® appears, give the child an opportunity to retrieve it independently before providing help.
The goal is for recognition developed during instruction to transfer to actual reading.
Turn SnapWords® Practice Into Active Reading Games
Once children have learned a group of SnapWords®, give them opportunities to use those words in meaningful phrases and sentences.
One activity Sarah used was a simple form of SnapWords® Charades.
Write a short phrase or sentence using words the child has already learned. Have the child read it first, think about what it means, and then act it out.
For example:

Come down here.
The child reads the sentence and then acts out coming toward you or moving to the place you indicate.
Or:
Stop and call now.
The child reads the words and acts out stopping and pretending to call someone.
You can make the activity more playful by providing simple props when appropriate or by letting children take turns choosing, reading, and acting out the sentences.
The important sequence is:
read → understand → act
The movement isn't simply added to keep children busy. The child has to understand the language well enough to demonstrate its meaning.
As children become more comfortable, make the phrases or sentences longer and combine current SnapWords® with words from previously learned lists. This provides cumulative practice while encouraging children to retrieve familiar words in a new context.
You can use the same principle in other games:
- Illustrate it: Read a phrase or sentence and draw what it means.
- Build it: Arrange word cards to make a sentence, then read it.
- Unscramble it: Put a familiar sentence in the correct order and read it aloud.
- Bingo: Use previously taught SnapWords® for retrieval practice.
- Go Fish: Match or collect previously taught words while reading each one.
- Read and do: Read a short direction and carry it out.
The goal isn't simply to make practice entertaining. These activities give children repeated opportunities to recognize familiar words, understand them in context, and use what they've learned.
As recognition becomes more automatic, gradually reduce the extra supports and continue practicing the words in ordinary print, sentences, writing, and connected reading.
Step 9: Add Tactile and Hands-On Practice
Some children benefit from additional hands-on reinforcement.
Activities from Beyond Sight Words Activities can provide practice that incorporates

touch, movement, spelling, writing, and word manipulation.
Depending on the child and the word, activities might include:
- building words with letter tiles
- tracing or writing words
- sorting words by spelling pattern
- matching words
- manipulating letters
- using words in sentences
- playing word-recognition games
Choose activities that reinforce the specific literacy skill being taught.
Hands-on learning is most useful when the activity helps the child think more deeply about the word—not simply when it makes the lesson more entertaining.
Step 10: Practice Spelling and Writing
Reading and spelling reinforce one another.
Once children are familiar with a word, give them opportunities to spell it without simply copying it.
Have them:

say the word
listen for the sounds
think about the spelling
write the word
and:
check their work
Then use the word in a sentence or short piece of writing.
This moves learning beyond recognition and helps children build a stronger connection among the word's pronunciation, spelling, meaning, and use.
Step 11: Review Until Recognition Is Automatic
Continue reviewing words from previous levels even as new words are introduced.
The goal is for a child to see the plain printed word and recognize it quickly and accurately without needing the illustration, body motion, or another prompt.
You don't need to wait until every word is absolutely perfect before introducing anything new, but words that remain difficult should continue appearing in review.
Some children will need only a few exposures.
Others will need substantially more practice.
That is okay.
The purpose of the levels is to provide structure—not to create a race.
Step 12: Move to the Next Level
When the child recognizes the words in the current level securely, begin the next group of approximately 10–12 words.
Continue the same cycle:
Introduce
↓
Teach explicitly
↓
Use the Mini-Lesson
↓
Reinforce with visual, verbal, and kinesthetic supports
↓
Flip to plain text
↓
Practice retrieval
↓
Read, spell, and write
↓
Review
Then repeat the process with the next level.
A Simple SnapWords® Teaching Routine
If you want an easy routine to remember, use this sequence:
1. Display
Place the current 10–12 SnapWords® in a pocket chart.
2. Teach
Use the Mini-Lessons to explicitly teach the words, sounds, spellings, and meanings.
3. Reinforce
Use the meaningful illustration, body motion, verbal cue, and appropriate tactile activities.
4. Flip
Turn learned cards to the plain-word side.
5. Retrieve
Mix the words and practice recognizing them without the pictures.
6. Apply
Read the words in Easy-for-Me™ Children's Readers and use them in spelling and writing.
7. Extend
Use activities from Beyond Sight Words Activities when additional hands-on practice is helpful.
8. Display
Add learned words to the word wall in plain text.
9. Review
Continue mixing previously learned words into practice.
10. Progress
Move to the next level and repeat.

How Often Should You Practice SnapWords®?
Short, consistent practice is generally more useful than occasionally working through a large stack of cards.
The exact amount of practice will depend on the child, age, setting, and instructional needs.
Rather than focusing only on minutes or repetitions, watch what the child can actually do.
Can the child:
- recognize the word on the plain side?
- recognize it after time has passed?
- read it when mixed with other words?
- spell it?
- recognize it in a sentence or book?
- use it in writing?
Those outcomes tell you more than simply counting how many times a card has been practiced.
What If a Child Can Read the Picture Side but Not the Plain Side?
That tells you the child is still relying on the instructional support.
Don't consider the word mastered yet.
Return to the lesson and strengthen the connections among the sounds, spellings, meaning, and printed word.
Then practice the plain side again.
You can also:
spell the word
write it
build it
compare its spelling with similar words
and:
find it in connected text
The goal isn't to remove the picture as quickly as possible. The goal is to remove it when the child is ready to retrieve the printed word independently.
Should Children Sound Out SnapWords®?
Children should absolutely use their developing knowledge of phonics and sound-spelling relationships when working with SnapWords®.
Some high-frequency words are completely decodable using phonics patterns the child already knows.
Others contain a spelling pattern the child hasn't learned yet.
Still others contain an unexpected or less common sound-spelling relationship.
Teach what is regular and explicitly identify what needs additional attention.
As the child's phonics knowledge grows, more words that once seemed difficult become understandable through familiar spelling patterns.
Can SnapWords® Be Used With a Phonics or Structured Literacy Program?
Yes.
SnapWords® can be used as supplemental multisensory reinforcement alongside explicit, systematic literacy instruction.
If your curriculum already provides a phonics sequence, you can use SnapWords® to reinforce high-frequency words and sound-spelling relationships that have already been introduced.
SnapWords® do not require children to abandon decoding or use pictures to guess words in connected text.
The illustration is an instructional support on the card. Children ultimately practice and recognize the word in plain print.

Can I Use SnapWords® in a Classroom?
Yes. SnapWords® work particularly well with pocket charts, making them easy to incorporate into whole-group, small-group, intervention, and review activities.
Teachers can display the current level, flip individual cards to plain text as students become secure with them, and move mastered words to a word wall.
Students do not necessarily need to progress at exactly the same rate.
Words that need more practice can remain in review while other words move forward.
A Simple Weekly SnapWords® Classroom Routine
Sarah developed practical ways to fit SnapWords® instruction into an already busy school day. One of her classroom routines was to introduce a group of words at the beginning of the week and then revisit those words in short activities throughout the week.
Monday: Introduce the Words
Place the current group of SnapWords® in a pocket chart where students can easily see them.
Introduce each word explicitly. Tell children what the word says rather than asking them to guess. Use the Mini-Lesson, sentence, and body motion to help students connect the printed word with its pronunciation, spelling, and meaning.
For example, a motion for AND might involve joining the fingers together while saying a sentence such as, “It is blue AND green.” For HERE, students might point to the floor beside themselves while saying, “Come right HERE.”
These motions are not simply opportunities to move. They reinforce the meaning of the word while students attend to the printed form.
Tuesday–Friday: Retrieve, Practice, and Apply
Return to the words for short periods throughout the rest of the week.
Rather than simply showing the cards repeatedly, vary the practice. Students might:
- recognize words from the plain side of the cards
- use the words in sentences
- spell or write them
- play a word-recognition game
- find the words in connected reading
- use the words during writing
- practice words that still need additional reinforcement
Continue mixing previously learned words with the current group so students must retrieve words rather than simply remember the order in which they were presented.
No Extra Time in the Schedule?
SnapWords® practice doesn't always need to become another separate lesson.
Sarah found creative ways to revisit words during moments that already existed in the school day. Teachers can:
- display current words where students will see them throughout the day
- review a few words while students are waiting in line
- refer to displayed words during writing
- use familiar words in directions written on the board
- take advantage of other brief transition or review periods
The goal isn't to fill every spare moment with instruction. It is to provide short, meaningful opportunities for retrieval and application without requiring another lengthy lesson.
Check Progress
Before beginning a new group of words, it can be helpful to identify which words students already recognize automatically in plain print. After instruction and practice, check those words again.
Don't look only at whether a child can recognize a card immediately after it has been taught. Look for whether the child can recognize the plain word later, among other words, in a sentence or book, and eventually use it in spelling and writing.
That provides a much better picture of whether the instructional support is leading toward independent word recognition.
Can I Use SnapWords® at Home?
Yes. The same instructional sequence can be used by homeschool families and parents providing additional reading practice.
You don't need to recreate a classroom.
Work with a manageable group of words, use the Mini-Lessons, practice the plain side, read together, incorporate spelling and writing, and keep sessions positive and manageable.
Consistency matters more than creating elaborate lessons.
The Goal: From Support to Independence
The most important principle when teaching SnapWords® is that the supports are designed to lead to independence.
The illustration, movement, story, and hands-on activities help make abstract information meaningful during learning.
But eventually the child should be able to see:
NIGHT
rather than the illustrated SnapWords® card and immediately recognize the word.
And when the child encounters night in a book, the card should not be necessary.
That progression—from supported learning to independent recognition—is what effective SnapWords® instruction is designed to accomplish.

Learn More About the SnapWords® System
If you're looking for an explanation of what SnapWords® are, how they work, and how they relate to phonics, orthographic mapping, and the Science of Reading, visit:
The Child1st SnapWords® System
If you're ready to choose cards, kits, readers, or supplemental resources:
Leave a comment