
8 Examples of How to Use Visual Cues with Visual Learners

Sarah Major, M.Ed. is passionate about working in harmony with a child's immaculate design to support their learning strengths. As a Title 1 Program Director and Designer, Sarah earned awards for creating her own multisensory educational resources that have now been sold in all 50 states and over 150 countries. By design, Sarah’s approach meets the needs of visual learners by providing images that align with their natural ability to think in pictures, leading to rapid learning.
Learning and remembering can be difficult for visual learners because they think in pictures and don't easily process what they hear orally. We can make learning so much easier for these students by creating materials that use their strengths! When we utilize visuals we give them new information in a form that matches the way they think. We believe in explicitly teaching all children the structure of words and preparing them before they read so they will be successful. It's important to teach all components (Images) beforehand as we do not promote having children guess. For more information on this topic, please read this blog about our system!
Here are eight examples of how to effectively use this strategy
1. Use visual cues as reminders
 A visual cue might be something as simple as a little picture drawn on a sticky note to remind your child to clean their room.
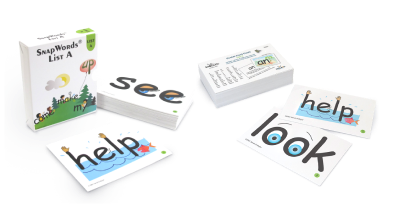
SnapWords® are high-frequency words that have both visual cues and body motions which make words easy to learn.
2. Use a visual and tactile cue to help your child with directionality

3. Use a visual cue to remind a child of the sound and shape of a letter
 The letter M looks like two mountains, and the initial sound of mountains is the sound for M.
(This is a hand drawn version of our Alphabet M image.)
Alphabet Teaching Cards supply similar visuals for each letter in the alphabet. These illustrations mirror those found in Alphabet Tales.

4. Use a visual cue to remind a child of a word and its meaning
 This SnapWords® image shows a child installing a stake for a tent. The visual shows the word, what it means, and differentiates the steak that you eat from the stake you pound in the ground. For visual learners who need to see the whole word, the context, and the meaning of the word, our SnapWords® are very effective.
306 SnapWords Teaching Cards contains 342 of the most commonly-used words in children's books.
5. Use fingermapping as a visual cue for spelling
 Fingermapping is a valuable visual cue that helps learners instantly grasp a visual map of the structure of a word, including multi-letter spellings of sounds. Fingermapping creates an effective pathway from not reading to reading.
The Illustrated Book of Sounds & Their Spelling Patterns will walk you through fingermapping every word you teach. It also contains all the sound spellings in our language presented in a kid-friendly, engaging format.

6. Use visual cues to help children remember which way to turn the letter J
 If the letter is written backwards, its sharp point will puncture the letter that follows it. Turned correctly, every letter is safe!
Use the Display Alphabet along with Alphabet Tales so your students can have access to the visuals any time they need a reminder.
7. Use a visual cue for words that end in OW plus N
 These words include “clown, brown, town, frown, brown." The OW is a spelling pattern that makes a unique sound, and the N tags along behind.
Sound Spelling Teaching Cards are very similar to SnapWords® except that they teach each sound spelling in our language including OU and OW. Visual cues make learning building blocks of words enjoyable.
8. Visual cues demonstrate that OW represents two distinct sounds: OH and OW

This illustration provides a visual cue, but also provides a kinesthetic prompt if your child actually mimics the motion shown in the visuals. The first child is saying OH! Like in “Oh, I forgot!” while the second child is crying and yelling “OW!”
Sound Spelling Display Cards are effective resources that coordinate with Sound Spelling Teaching Cards. Each full sized card (8.5" x 11") focuses on one sound and details all the ways to spell that sound.

Adding stories to visual cues will enrich the learning experience for visual learners by utilizing another pathway to the brain. Stories are powerful because they provide context for learning new material and are an opportunity to elaborate on concepts you are teaching. Here are some examples of stories that accompany visuals.
A Story for the Hour and Minute Hands on a Clock

Telling a child that the long hand on a clock goes fast and the short hand goes slow is totally forgettable. If, however, you link the hands of the clock to the story of the Tortoise and the Hare, it will be easy for the child to remember that while the Tortoise crawls slowly from one number to the next, the Hare bounds rapidly from number to number during the same amount of time. While this image is a visual cue, the story reinforces the concept you are teaching.
A Story for What Fractions Mean
This story explains the function of both numerator and denominator. You are going to bake a cake and need to put tools that you will use on the table top. The storage under the orange table shows how many tools you have in all. You are showing that you have 7 tools, but you are only using 3.

This image shows the fraction 3/7.
A Story for Plural and Possessive Tense
Visuals with mini stories help children remember how to tell the difference between a plural and a possessive tense. Just telling a child that Moms means more than one, while Mom’s means something belongs to Mom will not be enough for a visual learner. Instead, use a visual cue and mini story to cement learning.
This visual shows plurals: more than one boy and more than one Mom.

When talking about this image with your child, you could say, “The boys went to ask their Moms if they could go swimming."
This second visual shows possession: the boy’s dog and the Mom’s baby.

The people’s arms show the location of the apostrophe.
When talking about this image, you might say, “The boy’s dog is brown,” and “The Mom’s baby is smiling.”
A Story for Learning "Foot" and "Inch"

The inchworm farmers in Farmerville believed everyone should have the same size farm. The problem was, they didn’t know anything about measuring. At a town meeting, they agreed that they would just use their feet to walk the perimeter of their farm and each farmer would have 200 “feet” on each side of their farm.
The problem was, each farmer had a different size foot and those with the biggest feet had the biggest farms! Next, they hit on the idea of using foot long hot dogs to measure. Feeling very brilliant, farmers ran out and each bought a foot long hot dog to use to measure.
Problem was, the hot dogs became stinky and rotten and had to be thrown out! At the next town meeting, a little boy cut into their arguments with the suggestion that they make a wooden foot for each farmer, and thus ended the argument about the size foot to use. So that is what they did.
Using Stories and Visual Cues is Great for a Laugh
One kindergartner went home and shared with her mother the story of the inchworm farmers who tried using foot long hot dogs to measure and how the hot dogs rotted. Her mom picked up the phone and asked me, “What in the world did you teach my child today!?”
Apparently, her daughter was not able to relate in total brilliance the whole story of the inchworm farmers, but she truly remembered the terms “inch” and “foot” and remembered also their relative sizes! In addition to helping Alex remember the terms, a byproduct of this lesson was that it gave her mother and I a chance to enjoy a good laugh!