
How to Teach Right-Brained Learners

Sarah Major, M.Ed. is passionate about working in harmony with a child's immaculate design to support their learning strengths. As a Title 1 Program Director and Designer, Sarah earned awards for creating her own multisensory educational resources that have now been sold in all 50 states and over 150 countries. Sarah’s approach inspires learning by taking dry facts and making them come to life through the use of stories, images, and body movements.
Too often, the wonderful stuff we need children to learn in school seems dry, irrelevant, boring, and hard to learn and remember. What is missing is that element that will create meaning or that “something” to which students can relate. Without the ability to relate to what they are learning, internal motivation to learn might be low. What is also missing from traditional lessons are the right-brained elements that right-brained processors can latch on to.
Right-Brained Children Learn Differently than Left-Brained Children
When children don’t learn, it isn’t because their brains can’t learn. It isn’t because they are less capable or disabled in some way. If we embrace the idea that every dry fact (left-brained concept) can be packaged and delivered with enticing right-brained elements, our students’ desire to learn and achievement levels will sky-rocket.
Right-brained children learn differently from left-brained children. The more we understand how right-brained children learn, the easier it will be to create lessons that reach both left-and right-brained learners. This blog post will provide tips for creating a right-brained lesson and will give you an example of left-brained content made right-brained friendly.
Stories are a Powerful Teaching Tool
Story can put us right in the situation and make it personal to us. It makes material unforgettable. Interestingly enough, when someone hears a story, their brains are stimulated as though they were actually experiencing the story. The scents and smells, the colors, the comfort, the fright, the strenuous race uphill, the chill of the wind – all becomes real to the brain.Images Grab our Attention and Engage Learners
Image is another very powerful right-brained element. An image can convey content and emotions in a glance, and what goes into visual memory is permanent. Our brains are able to recall learning concepts much more easily when an image is paired with the content.
Body Movement Improves Focus
Body movement is a third superpower that will provide many benefits in your classroom. Often, what we do is recalled far more than what we just hear. Adding movement to your lessons will help improve focus, retention, and memory.
Here are Several Right-Brained Strategies to Incorporate into Your Lessons
There are other significant right-brained elements that make for memorable learning experiences. Included are color, music, pattern, metaphor, and rhythm. Another important technique for breathing life into otherwise dry vocabulary is word origins and their meanings. A child can learn a big, unfriendly word if he knows what it really means. Memorization is not enough!
Right-Brained Teaching Tools that Work

How to take a Left-Brained Lesson and Make it Right-Brain-Friendly
Let’s teach the water cycle.
We can either explain it verbally and ask children to memorize the vocabulary used in describing the water cycle, OR we can create a very engaging right-brained lesson that will teach the water cycle unforgettably. Here is how to do it. (Download a printable copy of this right-brained lesson on the water cycle and sample SnapWords® Science Teaching Cards).
1. Teach the Vocabulary in a Meaningful Way
How to Teach the Water Cycle Vocabulary: evaporation, condensation, and precipitation. Please use SnapWords® Science Teaching Cards to introduce the words and then follow the steps below for breaking the words apart and teaching their meaning.
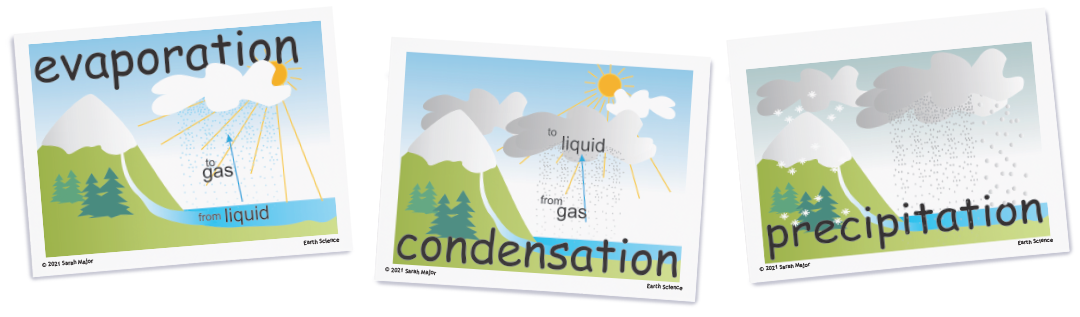
First, look at word origins. What is the meaning of “ation?” Ation talks about the act of doing something or the process of doing something. Next, look at the beginning of each word to see what the action is.
Use these root words unrelated to this particular lesson. If you lose a paper you need, tell the students it evaporated from your desk. If you are picking up art materials, suggest that you can condense them into a smaller bin. When a student gets the whole class laughing about something, say he precipitated a laugh fest. Hand out brownie points all week to the children who use their new words in conversation.
2. Utilize pattern detection
Each of our three words end in “ation” but the pattern I noticed is that the endings are in alphabetical order: “ration” “sation” and “tation.”
3. Rely on images
Here is a sketch I made of the water cycle. Using an image will show kids easily the interrelationship of the concepts. What comes first, what follows next, and where it goes from there.

4. Tell a story
The story can be as simple as talking about a family who lived out by the lake. They loved to sit on the hill by the big pine tree and watch the weather. On sunny days, even though they couldn’t see this happening, the hot sun helped the water in the lake to rise in tiny vapor droplets. (Evaporation) These joined together to make fluffy white clouds. Then many droplets bumped together, condensing into bigger and bigger drops… (Condensation) until suddenly, they were too big to stay in the air and they began to fall suddenly. (Precipitation). The family loved every part of this cycle and didn’t even mind getting wet when it rained!
5. Act it out
It is so much fun to have your children act out the water cycle. I did this with my 1st grade class. True story.

- I was the sun. They were the droplets of water.
- We made a big circle of our chairs around the rug.
- The students started out lying closely together on the rug – to make a lake (a giggling lake).
- Next, I stood on a chair and spread my arms out wide. I was the sun beaming down on them.
- I prompted them to evaporate. As they chanted, “evaporation,” they slowly rose from the rug and climbed onto chairs.
- Next, I prompted them to condense. Carefully they got as close to each other on the chairs as they could without falling and chanted, “condensation!”
- Finally, as they yelled, “precipitation,” they all fell onto the rug again to make a lake.
Right-brained lessons produce amazing results
Children are always able to learn far more than we expect. The keys to unlocking astonishing learning are to suspend any artificial limits we place on children, commit to learn from the child how they learns best, and provide an environment in which this can happen.
First graders can learn big hard words. The key is to make the words make sense and to use them. By adding right-brained elements to dry dusty facts, even young children can learn and understand really big concepts.
FAQs About Right-Brained Learning
Q: Do right-brained kids learn differently than left-brained kids?
A: Yes! In fact, their processing styles are nearly as opposite to each other as you can get. Please read about right-brained learning and learners here: What is Right-Brained Learning? And Is Your Child a Right-Brained Dominant Learner?
Q: Are right-brained learners visual-spatial learners?
A: Yes they are! Right brained learners think in pictures and tend to see the whole picture with all the little related details included in it. They benefit from maps, charts, visuals, illustrations, graphs, graphic organizers, and more. They tend to be tactile and kinesthetic also. Learn more about right-brained learners in this blog called The Learning Spectrum.
Q: What are the characteristics of Right-brained learners?
A: The Learning Spectrum outlines the dominant characteristics of both left and right-brained learners. You may also learn in far more detail the characteristics of right-brained learners by reading, Is Your Child a Right-Brained Dominant Learner?
Q: What are some right-brained learning techniques?
A: Right-brained learners might find school a bit difficult because most lessons are designed perfectly for left-brained children. But there are ways we can help ourselves! We can draw pictures of what is happening both in a story we need to read and in a math problem we need to solve. We can make organizers for ourselves that show the relationships of details inside a whole. We can use color-coding, think of metaphors (such as the circulatory system is like a system of highways), tell a story to explain why different things are related to each other. We can make up body movements that will help remind us of what we are learning.
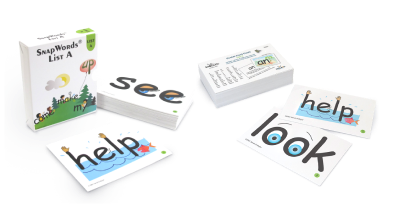
Q: How can I teach right-brained learners sight words so they can remember them?
A: Memorization will not work for right-brained learners! The very easiest way to teach a right-brained learner a collection of sight words is by using SnapWords! They were designed especially for right-brained learners and have a track record of success that is astonishing.
Find out by using our kinesthetic checklist!
Read more about right-brained learning
What is Right-Brained Learning?
Is Your Child a Right-Brained Dominant Learner?
How to Strengthen Left-Brain Processing for Right-Brained Learners
Find Products Especially Designed for your Tactile and Kinesthetic Learners


Do you need help making left-brained lessons right-brained friendly?
We are here to help! Just reach out and someone on our team will be happy to answer your questions and show you how to help all students love learning!